Base lesson 2,
step 4: Connect to the database
This
step of the tutorial
* adds the JAR-file with the package for
access to SQL-databases and
* connects to a database specified by
the parameters read from a XML-file (see previous step).
Preface:
The
code written in this tutorial is far away from being
optimized.
Emphasis of this tutorial is to develop the application
in small steps where the completion of each step allows the
application to be run eror-free and showing the result aimed by the
step.
Therefore the code is written to be understandable in favor
of being optimized.
Credits:
I
derived the guideline how to access a database within a
JAVA-application from:

www.developer.com/java/data/article.php/3417381.
Prerequisites:
Preparation:
Methods
for accessing databases within JAVA-applications are contained in an
(external) Java-ARchive depending on the database-system used.
For
this example, MySQL is used.
The download of the JAR-file with the
MySQL-specific packages is described under JS_DB01
– Set up the MYSQL database for access by JAVA-applications.


For the following descriptions in this tutorial, it is
assumed, that the JAR-file has the name
'mysql-connector-java-3.1.12-bin.jar' and is stored in directory
'/usr/java/j2sdk1.4.2_08/lib/extern' .
The
JAR-file with the MySQL specific package has to be integrated als
Library in the build path.
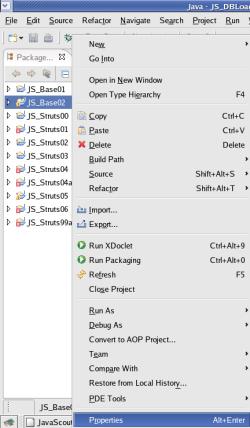
Mark the project 'JS_Base02', right
click with the mouse and select >Properties
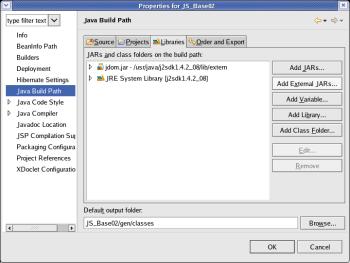
On
	the window that just openend select 'Java Build Path' (on the left
	side) and the tab 'Libraries'.
Then click the button [ Add
	External JARs... ].
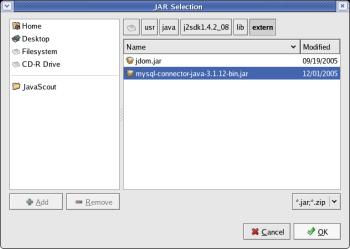
Manouvre
	to the directory '/usr/java/j2sdk1.4.2_08/lib/extern' and select the
	file 'mysql-connector-java-3.1.12-bin.jar'.
Then click the
	button [ OK ].
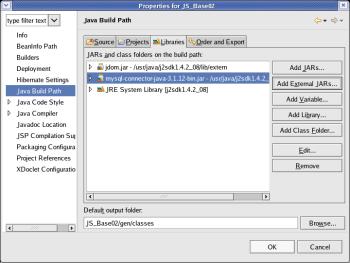
The
	incorporation of the selected JAR into the Java Build Path is shown.

Click the button [ OK ].
Code
to connect to the database:
In
the following explanations all new code is written in bold
letters.
Code generated by the template or entered in previous
steps (old code) is in italics.
Larger blocks of old code may be
skipped.
To
access methods for the database-handling, the package
java.sql
must be imported in class
'JS_DBLoad__Action_Handler'.
package
js_base02.application;
import
java.awt.*;
import
java.awt.event.*;
import
org.jdom.*;
import
org.jdom.input.*;
import
java.sql.*;
*
* @author kurt@javascout.biz
*
@date 2006-02-10
The
	next task is, to implement a connection for the database access and
	a method to perform the connection.
Please notice, that the call
	of the method is shown 'in error' as the method is not already
	implemented.

    protected
	static void processDBLoad(JS_DBLoad
	parmCallingFrame){
/*
 *
	Define an array that holds the parameters for the database-access */

      String[]
	array_DBParms;
/*
	Call the method that extracts the parameters from the XML-file */

      array_DBParms
	= processGetDBParms(parmCallingFrame);
/*
	Perform the connection to the database */
      Connection
	conToDatabase = null;
      conToDatabase
	= processConnectToDatabase(parmCallingFrame, array_DBParms);
    }
The
	code for connecting to the database is written in a separate
	method.

    protected
	static void processConnectToDatabase(JS_DBLoad
	parmCallingFrame,
	String[] parm_array_DBParms){
      Connection
	ConToDatabase
/*
 *
	Connection is coded within the try/catch frame to catch exceptions
	*/
      try
	{
/*
	Create the class 'DriverManager'.
 * This class is specific
	for each database-system and defined by parameter */

        Class.forName(parm_array_DBParms[0]);
/*
	Driver-Manager was successfully created; report on GUI */

        parmCallingFrame.get_txt_Report().append(„DriverManager created for: „ + parm_array_DBParms[0] + „\n“);
/*
	Use DriverManager to establish the connection to the database.
 *
	The database is specified by parameter. */
        ConToDatabase
	=
          DriverManager.getConnection(parm_array_DBParms[1], parm_array_DBParms[2], parm_array_DBParms[3]);
/*
	Connection to database establishes; report on GUI */

        parmCallingFrame.get_txt_Report().append(„Connection
	to database successful \n“);
/*
	Set 'AutoCommit'; this prevents losing changed on data to due a
	forgotten 'commit'.
 * This is fine for the tutorial - but
	should not be used on real-work-applications
* as a controlled
	'commit' or 'rollback' is not possible */

        ConToDatabase.setAutoCommit(true);
      }
      catch(Exception
	exc) {
/*
	An error occured within the try-block; report and set Connection to
	'null' */

        parmCallingFrame.get_txt_Report().append(„Error while connecting to database: „ + exc.toString() + „\n“);
        ConToDatabase
	= null;
      }
      return
	ConToDatabase
    }
Please
	remind to save the code just typed.
To
see if the code and parameters where typed error-free,
run the
application again by selecting >Run>Run
As>Java Application.
Do not forget to 'Select Input
File' and select the (till now empty) file with the SQL-commands -
otherwise the XML-file with the parameters will not be loaded
!
Click the button 'Start
SQL execution' thereafter.
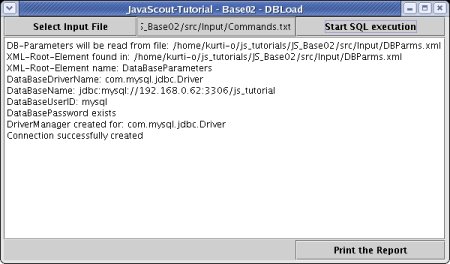
The
result of the shown screenshot should look like this:
top.
Next
Step: